Create your own rate tables
Follow this guide on how to set up a great rate table
Step 1: Create a new rate table
- A new rate table can be created via Shipping preferences or directly within a Postage Policy.
- To create a new rate table via Shipping Preferences go to Account Settings → Shipping Preferences → Edit under Use postage rate tables.
- To create a new rate table via Postage policies go to Account Settings → Business Policies → create a new postage policy or find an existing postage policy → Create rate table under Postage Rate Tables.

Step 2: Set up your rate table
- Select whether you would like to set your rates by item, weight or surcharge
- Item - set different rates and options for different locations.
- Weight - set a fixed base cost + additional amount per kg. Based on the dimensional weight or physical weight of the package—whichever is greater.
- Surcharge - set a base cost and add a surcharge by region.
- Name your rate table

Step 3: Select your regions
- Under ‘Regions’, select the plus (+) to select the regions you wish to specify.
- Download our rate table region and postcode list here.

Step 4: Select your service
- Under the second column 'Select delivery service', select the service you are posting your items with
- To reduce queries from buyers about estimated delivery dates, make sure you specify your chosen postage service. The 'Standard Parcel Delivery'; postage service option should only be selected if your chosen carrier is not listed or you’re using an aggregator to post your items.

Step 5: Select your cost
- Under the 'Cost' heading, type in the cost you wish to charge for that region and service specified.
- If you want to offer free delivery, then add $0 to this field.

Step 6: Complete your rate table and save
- Repeat steps 3 to 5 for all other regions
- Ensure you have specified both standard and express postage if you offer both
- Save your rate table
Once completed, you will need to attach your rate table to your listings.

Attaching your rate table to a listing
Rate tables can be attached to your listings in the following ways:
Option 1 - Listing flow
- In the Shipping section, select ‘Edit all options’.
- Select ‘Shipping cost type’ as ‘Flat shipping’.
- Open ‘Domestic’ settings.
- Add the rate table you created from the dropdown menu to your listing.
- Select a default shipping option on the listing page. (This setting will be used for any buyers that fall out of the regions specified in the rate table. We recommend keeping this calculated shipping so that buyers can contact you.)
Option 2 - Business Policies
- Go to business policies
- Select the postage policy which reflects the rate table you have created
- Check the box “Apply domestic postage rate tables” underneath ‘Postage rate tables’.
- Select your rate table from the dropdown list. It will appear under the name you labeled your rate table as.
- Click ‘Save’ for the rate table to apply to this postage policy and all listings within it.

Option 3 - Using the API
You can find out more about using delivery rate tables through the API here.
There are two ways to add a postage rate table through the API:
- Add postage rate tables at the listing level. Find out more
- Add postage rate tables with business policies. Find out more
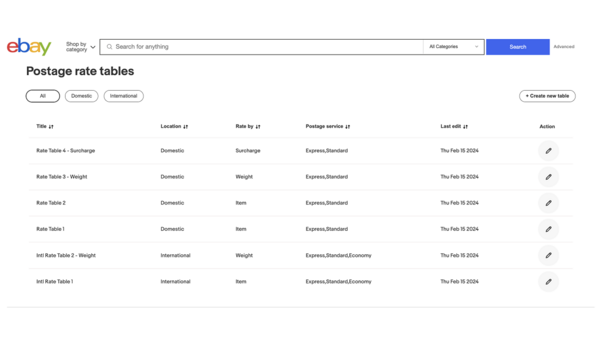
Manage your rate tables
You can view all your domestic and international rate tables in one place via Account Settings → Shipping Preferences → Edit under Use postage rate tables. To edit any of your current rate tables, simply click the button under the Action column of the rate table.
Learn more about postage rate tables
Head to the pain postage rate tables page to learn about tips, exclusions, and FAQs